

Telecomando IR Smart con SmartHome su Home Assistant
In questa guida scopriremo come creare un piccolo “Broadlink Casalingo” smart in grado di inviare e ricevere segnali IR , utile per domotizzare accessori obsoleti come: tv, amplificatori, climatizzatori e molto altro.
Grazie a SmartHome è possibile inviare e ricevere sia codici HEX che RAW.
Di seguito i punti che affronteremo:
- Materiale Necessario
- Collegamenti
- Flash SmartHome
- Configurazione SmartHome Wifi
- Configurazione SmartHome MQTT
- Configurazione SmartHome Nodo IR
- Acquisizione Codici IR
- Invio Codici IR
- Script su Home Assistant
1.Materiale Necessario:
Prima di assemblare il nostro telecomando smart abbiamo bisogno dei seguenti componenti:
Di seguito troverete i link dei componenti da acquistare dai principali store Amazon – Bangood – Aliexpress
- Modulo IR Kit – Amazon
- Mini D1 – Amazon
- Download: “SmartHome”
- Download: “Tasmotizer”
NB: E’ possibile utilizzare anche un NodeMcu e ricavare i sensori RX & TX da vecchi televisori o elettrodomestici.
2.Collegamenti:

Ricevitore:
- Cavo Nero su G
- Cavo Rosso su 3v3
- Cavo Azzurro su D5
Trasmettitore
- Cavo Nero su G
- Cavo Verde su D6
3.Flash SmartHome:
– Collegare Mini D1
– Aprire “Tasmotizer” :

- Select port: selezionare la porta COM.
- Selezionare: BIN File“
- Cliccare su “Open“
- Selezionare il Firmware SmartHome precedentemente Scaricato.
- Cliccare su “Tasmotize“
4.Configurazione SmartHome Wifi
– Selezionare la rete Creata dal dispostivo e connettetevi.

– Aprire il Browser internet e collegarsi all’indirizzo
- Indirizzo Browser: 192.168.4.1
– Inserire i seguenti dati:
- SSID: Nome Rete Wifi
- Password: Passoword Rete Wifi
- IP: Scegliere un indirizzo IP per il vostro dispositivo [ Esempio: 192.168.1.50 ]
- Gateway: Inserire: l’indirizzo IP del vostro modem [ Esempio: 192.168.1.1 ]
- Subnet: Inserire: 255.255.255.0
- Dnsip: Inserire: 8.8.8.8

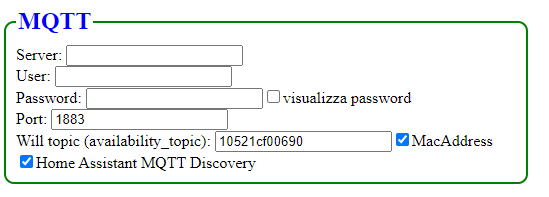
5.Configurazione SmartHome MQTT
– Inserire i seguenti dati:
- Server: Indirizzo MQTT Broker [ Esempio 192.168.1.15 ]
- User: Nome Utente MQTT Broker [ Esempio Domhouse ]
- Password: Password MQTT Broker [ Esempio Domhouse ]
- Flaggare la voce ” Home Assistant MQTT Discovery”
6.Configurazione SmartHome Nodo IR
– Inserire i seguenti dati:
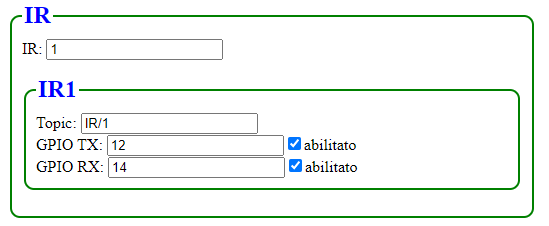
- Topic: Inserire IR/1
- GPIO TX: Inserire 12
- GPIO RX: Inserire 14
- Abilitare entrambi i flag
– Cliccare su “SAVE Configurazione & RUN SmartHome”
7.Acquisizione Codici IR:
– Verrà mostrata una consolle come in figura:
- Puntare il telecomando verso il modulo RX
- Premre il tasto da Clonare

Esempio Acquisizione HEX:
PROTOCOL: DAIKIN128
HEX: 0x162805035010285CA10000000000000B
HEX SIZE: 128
Esempio Acquisizione RAW:
FREQ: 3800
RAW: 9796,9892,9766,9870,4556,2568,316,368,344,1016,290,1048,262,444,288,1020,314,448,264,426
RAW SIZE: 265
NB: Se l’acquisizione del codice HEX da come messaggio: UNKNOWN procedere con il salvataggio del codice RAW
– Copiare il codice in un posto sicuro.
8.Invio Codici IR:
– Per testare che tutto funzioni correttamente proviamo ad inviare il comando appena acquisito:
– Cliccare su “Copia da RX a TX”
– Scegliere se inviare il codice in formato “RAW o HEX”

9.Script su Home Assistant:
Di seguito uno script in modalità RAW:
tv_test_raw:
  sequence:
  - data:
      payload: '{"FREQ":"38000","RAW":"8994,4476,550,586,576,560,550,586,548,586,550,586,550,586,550,586,550,586,550,1704,550,1706,604,1652,550,586,550,1704,550,1706,54","SIZE":"71"}'
      topic: IR/1
    service: mqtt.publish
Di seguito uno script in modalità HEX:
tv_test_hex:
  sequence:
  - data:
      payload: '{"PROTOCOL":"NEC","HEX":"0xEFB04F","HEX_SIZE":"32"}'
      topic: IR/1
    service: mqtt.publish
Questo contenuto ti è stato utile? ☕
Se ti va, puoi sostenere lo sviluppo e i costi del server
offrendomi un caffè simbolico!